

How to Fix Candle Tunneling: 5 Methods That Work
Table of Contents
- What Is Candle Tunneling and Why It Happens
- Method 1: The Foil Tent Technique for Candle Tunneling
- Method 2: Using a Candle Warmer to Fix Tunneling
- Method 3: The Hair Dryer Fix and Other Heat-Based Approaches
- How to Prevent Candle Tunneling Before It Starts
- When to Stop Repairing and When to Keep Trying
- Safety Precautions for Each Repair Method
- Frequently Asked Questions
Last Updated: October 12, 2026
What Is Candle Tunneling and Why It Happens
Candle tunneling happens when only the center of your candle burns down while wax builds up along the edges, leaving a ring of unburned wax that wastes wax and shortens the candle's life.
The root cause: the melt pool around the burning wick never reaches the outer edges. When this happens early and repeatedly, the side wax hardens before it can melt, and the candle "remembers" this pattern, so tunneling often returns even after a fix.
The Memory Ring Effect
Candles have a "memory ring." If the melt pool doesn't reach the edges on the first burn, the wax cools into a ring shape, and the flame follows that same narrow path next time. Create a full melt pool edge to edge and the candle burns evenly afterward; skip it, and you fight the candle's memory for the rest of its life.
Method 1: The Foil Tent Technique for Candle Tunneling
The foil tent is one of the easiest fixes for candle tunneling.
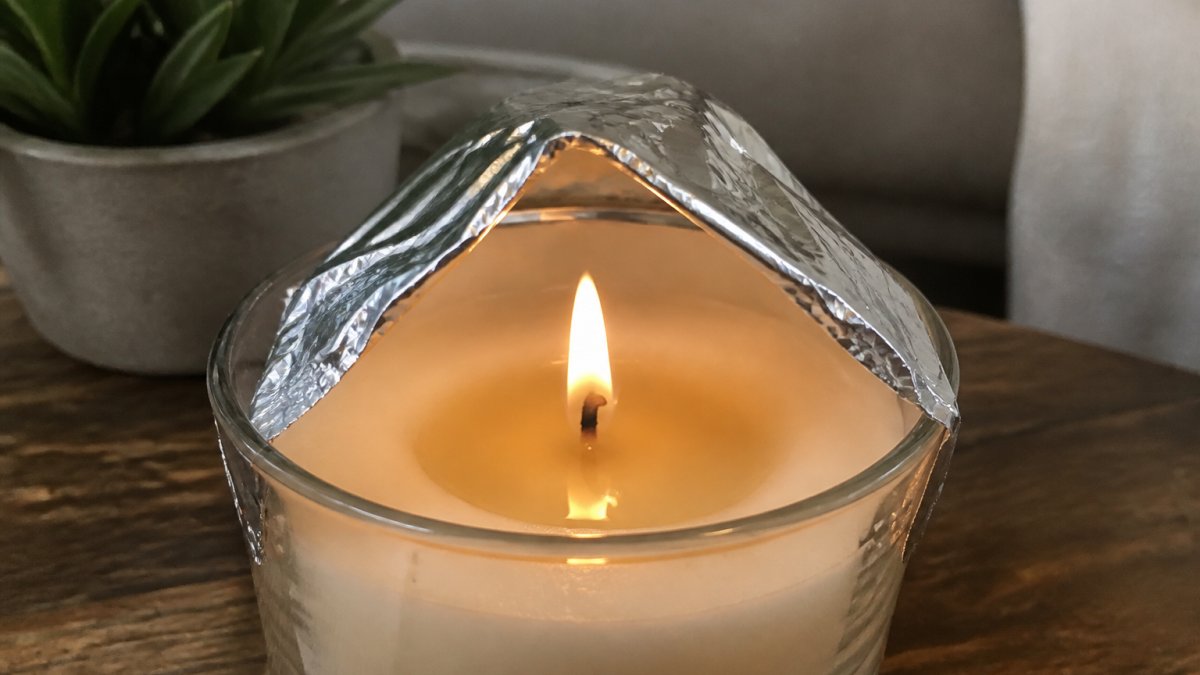
Here's how to do it safely:
- Tear off a piece of foil about 4 inches wide and fold it into a loose tent shape
- Position it around the wick so heat bounces toward the outer wax, keeping the flame fully exposed
- Leave it in place for 30-60 minutes, checking the melt pool every 15 minutes to make sure it's spreading
The foil traps heat that would escape upward, softening the outer wax ring into the center pool.
Safety note: Never let the foil touch the flame directly. Keep it a safe distance away so it only reflects heat, not catch fire.
Method 2: Using a Candle Warmer to Fix Tunneling
A candle warmer heats from below instead of relying on the wick flame, melting the entire surface evenly, one of the most effective ways to fix candle tunneling.
Candle warmers are useful because they:
- Provide steady, even heat without a flame
- Work on any jar size or shape
- Let you step away without constant monitoring
Safety consideration: Make sure your candle warmer has an automatic shutoff or low-temperature setting. Excessive heat can crack glass jars or damage the wax. Follow the warmer's instructions for how long to use it at a time.
Method 3: The Hair Dryer Fix and Other Heat-Based Approaches
A hair dryer on low heat can melt the outer wax edges. Hold it 6-8 inches away and aim at the outer ring for 2-3 minutes at a time, keeping the dryer moving so you don't overheat the wax or jar.
Other heat-based fixes include:
- Warm water bath: Place the jar in a bowl of warm water for 10-15 minutes to gently melt the outer wax.
- Sunny windowsill: On a warm day, place the candle in direct sunlight so the outer wax softens into the center.
- Oven method: Some people place their candle in a warm oven (200°F) for 5-10 minutes. This is risky, only try it if you're confident in controlling the temperature and won't overheat the wax.
Safety precaution: Never use a heat gun or high-temperature dryer. These can crack the jar, damage the wax, or create a fire hazard. Stick to gentle, low-temperature options.
How to Prevent Candle Tunneling Before It Starts
Preventing tunneling is easier than fixing it, and it comes down to three variables: how long you burn, how well the wick matches the vessel, and how you manage the environment around the flame.
The First-Burn Rule, With Actual Numbers
Light your candle and let it burn until the entire surface melts into one even pool reaching the container's edge. The time depends almost entirely on the vessel's diameter, not its height. As a rule, wax needs roughly one hour of burn time per inch of diameter, plus a buffer for wax type and room temperature:
- 2-inch diameter (tealights, small tins): 1.5-2 hours
- 3-inch diameter (standard jars): 2-3 hours
- 4-inch diameter (large jars, 3-wick vessels): 3-4 hours
These are estimates, not rules. Soy and coconut waxes need the longer end of each range; paraffin blends pool faster. A cold room, ceiling fan, or AC vent will stretch every number.
Why "Burn It for Four Hours" Is Bad Advice
Many labels say to burn no more than four hours at a time, worth following to prevent overheating and wick mushrooming, but it's a ceiling, not a target. If a 4-inch candle stops at four hours before the pool reaches the edge, you've started a tunnel. Burn in sessions that respect both limits:
- Burn until the pool reaches the edge, or until you hit the four-hour ceiling, whichever comes first.
- Let the candle cool completely and trim the wick to 1/4 inch.
- Relight and continue until the pool reaches the edge.
Two shorter sessions that each end with a full-width pool beat one marathon burn every time, the most useful adjustment for wide vessels.
Match the Wick to the Vessel Diameter
The wick is the engine. Undersized for the container, and no careful burning will push the melt pool to the edge; oversized, and the flame runs hot, causing soot, a tall flame, and a drowning wick.
When you are evaluating a candle before you buy it, look for these signals:
- The maker lists the wax type and wick type (cotton, wood, or a specific series)
- The maker states a burn time that is realistic for the vessel size
- The jar diameter is proportional to the number of wicks (a 4-inch jar usually needs two or three wicks, not one)
If a candle tunnels from the very first burn despite a proper first-burn session, the wick is the most likely culprit.
Control the Environment Around the Flame
Drafts are the quiet cause of tunneling. A ceiling fan, open window, heating vent, or doorway foot traffic pushes the flame to one side, so the draft side melts faster while the opposite side stays solid, and that asymmetry becomes a tunnel.
A few practical moves:
- Place the candle on a stable surface away from vents, fans, and open windows
- If you cannot avoid a draft, use a hurricane glass or a candle shade to shield the flame
- Keep the wick centered. If it drifts, let the wax cool slightly and nudge it back with a wick dipper or a chopstick before the next burn
Keep the Wax Pool Clean
Debris in the melt pool, a match head, wick trim, or dust, can pull the flame off-center and burn down one side. Before each burn, remove anything sitting in the wax with a wick trimmer or tweezers.
A Simple Prevention Checklist
Before every burn:
- Trim the wick to 1/4 inch
- Confirm the wick is centered
- Clear debris from the wax surface
During every burn:
- Let the pool reach the edge, or stop at four hours, whichever comes first
- Never leave the candle unattended
- Keep it away from children, pets, and anything flammable
After every burn:
- Let the wax cool completely before moving the candle
- Cover it with a lid or a candle topper to keep dust out
- Store it flat and out of direct sunlight
Follow those three phases and tunneling becomes a problem you rarely see, even on candles that are not perfectly made.
When to Stop Repairing and When to Keep Trying
Not every tunneled candle is worth saving. Match the severity of the tunnel to the method, then decide whether it's still safe to burn.
A Decision Guide by Tunneling Severity
Mild: a shallow ring, less than 1/4 inch of unburned wax on the sides.
The wick still reaches the wax and the outer ring is thin.
Moderate: a visible crater, roughly 1/4 to 1/2 inch of unburned wax on the sides.
The wick is usable but the flame sits inside the tunnel.
The flame can't generate enough heat to reach the outer wax. Two options:
- Wax removal plus warmer. Remove some unburned outer wax with a wick dipper, spoon, or cotton ball so the wick isn't buried, then use a warmer to melt the surface flat. Let removed wax cool and throw it away, never pour it down a drain.
- Retire the candle. If removing wax leaves the wick too short to relight, it's done.
Stop. Do not try to dig the wick out with a knife or a screwdriver.
Signs a Candle Is Unsafe, Not Just Tunneling
Tunneling is a performance problem, not a safety one, but some conditions that look like tunneling are safety issues:
- Cracked or chipped glass. Heat stress can cause a compromised jar to shatter. Retire it.
- Soot streaks on the glass or a blackened wick. This usually means the wick is too large or the candle is in a draft. If it persists after trimming and relocating, the candle is not burning safely.
- A flame that flares, flickers wildly, or reaches more than about 1 inch high. Blow it out, let it cool, trim the wick, and try again. If it repeats, stop.
When to Keep Trying
Keep working on the candle if all of these are true:
- The tunnel is mild or moderate
- The wick is at least 1/4 inch tall and centered
- The container is intact, with no cracks, chips, or heat discoloration
When to Stop
Stop and retire the candle if any of these are true:
- The wick is buried below the wax line and cannot be reached without a metal tool
- The wick is shorter than 1/4 inch after trimming
- The container is cracked, chipped, or visibly heat-damaged
If a Repair Fails, Troubleshoot the Cause
A failed repair is a signal, not a dead end. Work through the likely causes:
- Wick too small for the vessel. The flame can't reach the edge, a manufacturing issue. Contact the maker.
- Wick off-center. The flame favors one side. Nudge it back while the wax is soft, or it will keep tunneling.
- Drafts. A fan, vent, or open window pushes the flame sideways. Move the candle and retry.
If you have ruled out drafts, wick height, and burn duration, and the candle still tunnels, the problem is in the candle itself. A maker who tests their wicks will want to know. A maker who does not is unlikely to fix it, and it is reasonable to stop buying from them.
Safety Precautions for Each Repair Method
Every fix involves heat, so safety matters.
Foil tent: Never cover the flame; keep foil at least 1 inch away; check every 15 minutes for discoloration; remove if hot to the touch; never leave unattended.
Warm water baths: Warm water, not boiling; confirm the jar is heat-safe; don't submerge completely; remove as soon as the outer wax softens; dry the jar before use.
Candle tunneling is frustrating, but you can fix candle tunneling with the right approach.
But the real win is prevention. At Pine Monte Premium Candles, we hand-pour every candle and test our wick sizes for each container to ensure a clean, even burn from start to finish.
Frequently Asked Questions
Can you reverse candle tunneling?
Yes, candle tunneling is reversible with the right approach. The foil tent method, candle warmer, and hair dryer technique all work to remelt the wax edges and create an even melt pool. The key is catching it early, once tunneling is severe and the remaining wax around the edges hardens completely, repair becomes much harder. Most tunneled candles can be saved if you act within the first few burn cycles after tunneling begins.
What causes candle tunneling?
Candle tunneling occurs when the wick burns down the center while wax along the edges remains unmelted, creating a hollow tunnel. The primary cause is a wick that's too small for the candle's diameter. When the wick can't generate enough heat to melt wax all the way to the vessel edges during the first burn, the candle 'remembers' that burn pattern. Drafts, room temperature, and burning the candle for too short a time on the first light also contribute to tunneling.
How long should I burn a candle to fix tunneling?
On the first burn, allow the candle to burn long enough for the entire melt pool to reach the vessel edges, typically 2-4 hours depending on candle diameter and wick size. For fixing existing tunneling, use the foil tent or candle warmer method for 1-2 hours at a time, checking progress every 30 minutes. Never leave a candle burning unattended for extended periods. If you're using a candle warmer, the gentle heat may take 3-4 hours to fully remelt stubborn wax edges.
Is it safe to burn a candle that has tunneled?
A tunneled candle is safe to burn, but it wastes wax and produces uneven fragrance throw. The main risk is that continued burning deepens the tunnel, making the wick burn hotter and potentially creating excess soot. Stop burning the candle as soon as you notice tunneling, then apply one of the repair methods before resuming use. Always trim the wick to 1/4 inch before each burn and ensure the candle sits on a level, draft-free surface.




Leave a comment
This site is protected by hCaptcha and the hCaptcha Privacy Policy and Terms of Service apply.